Student email: “Yesterday’s Zoom class was the most interactive and engaging Zoom class that I have been a part of, so thank you!”
Me: (Mental fist pump)
My excitement came not because I wanted accolades but because I had worked hard to make my hybrid class as interactive as my in-person class. This gave me hope that I was achieving my goal. I was able to accomplish this through activities designed using Jamboard, an app as well as a Google Suite tool that functions as a digital whiteboard.
As an education professor, I teach my college courses using strategies that I used with my K–12 students, and Jamboard is an excellent tool to use when some of your students are learning at home and some are in class.
6 STRATEGIES FOR USING JAMBOARD DURING HYBRID LEARNING
1. Concept maps: My first dive into Jamboard was to have students create concept maps. I started with a short group activity and discussion to get my students talking about the day’s content. Next, I put my students in breakout rooms on Zoom to create concept maps using Jamboard to show what they had learned about the content. Since one Jamboard can have several boards, I assigned each group a different board. To make it simple, I labeled the boards 1, 2, etc. Three of my students were in person, and the rest were virtual. The cool thing is that virtual and in-person students can work together on the same board at the same time.
I gave the students a short tutorial, and they went right to work. They had fun using different colors and shapes to make their boards attractive as well as informative. I was able to watch them work on their boards as they were creating them. I also hopped in and out of the breakout rooms to make sure everything was going well. After a designated time, I had them wrap it up and brought everyone back together to present the boards.
Since I had created multiple boards on one Jamboard, everyone could see all of the boards. This made it easy for the students to look at the boards as they were presented. The boards provided a wonderful discussion and teaching opportunity. I was able to expand on what they said and correct misconceptions. I added one last board at the end for them to post questions they still had. This allowed everyone to read the questions as I answered them.
It was very exciting to see and hear the engagement as I flipped through the boards, went into the breakout rooms, and walked around my classroom. The students were actively processing the information.
2. Inductive learning: Lessons that use this method call on students to investigate and categorize small bits of information in order to find patterns. I love using this at the beginning of a unit to help students connect to background knowledge and develop a foundation for their new learning, as well as at the end of a unit to solidify student understanding and clarify misunderstandings.
To incorporate Jamboard, copy and paste vocabulary words or concepts you want to use onto one board in your Jamboard. Then duplicate the board in the same Jamboard, creating one board for each small group you have. If you teach the same class more than once, you can duplicate the entire Jamboard for another class. Have each small group organize the words into categories that make sense to them. After they finish, have each group share their thinking with everyone else.
3. Gallery walk: I enjoy using this for review questions to determine understanding or as a jigsaw to share learning. Write a different question, statement, or concept on each board, or have the students create a board to share. Put students in breakout rooms. Start each group at a different board. Have them discuss what’s on the board and write a response. To keep everyone on track, use a timer, and have groups move to the next board when the timer goes off.
4. Four corners: Use something that can have multiple answers. Give each corner one possible solution, theory, or plan. Have the students choose their breakout room based on their choice of the best solution. Provide a board in your Jamboard for each corner. In their breakout rooms, they can build a case for their corner. They can present their ideas on their board to strengthen their case. Come back together to present ideas.
5. Idea lineup: Use this before and after a discussion. Choose a topic that elicits strong opinions. Create a Jamboard with a line that has the opposite choices at each end. Have the students put their initials, a picture, or a Bitmoji of themselves on the line showing where they stand on the matter at the beginning of class. Next, have a discussion and/or lecture. Close class with a new board where students place themselves again and talk about how their opinion did or did not change and why.
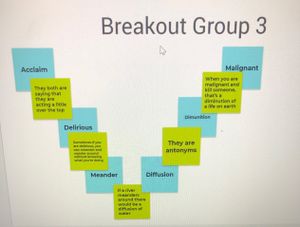
6. Vocabulary Vine: This is one of my favorite ways to strengthen vocabulary. Divide students into breakout rooms, and give each room its own board. Preload the boards with the vocabulary words on sticky notes. Have students start with one word and determine how it connects to another word. They will create a new sticky note between the words to show the connection.
One of my graduates, Jessica McDermitt, used Jamboard to do Vocabulary Vine in her high school English classroom.

Courtesy of Linnea Lyding
The ideas are endless. As a movement researcher, I ask my students to get up between boards. They can walk, jump, or dance around their room. Can you see it? Fun and learning combined in a hybrid classroom! (Real fist pump)


No comments:
Post a Comment